Starting with Custom Ad Provider in Ads Web SDK
Custom Ads give you the power to run any Ad provider, or any Ads, in StorifyMe experiences.

Custom Ad Fields
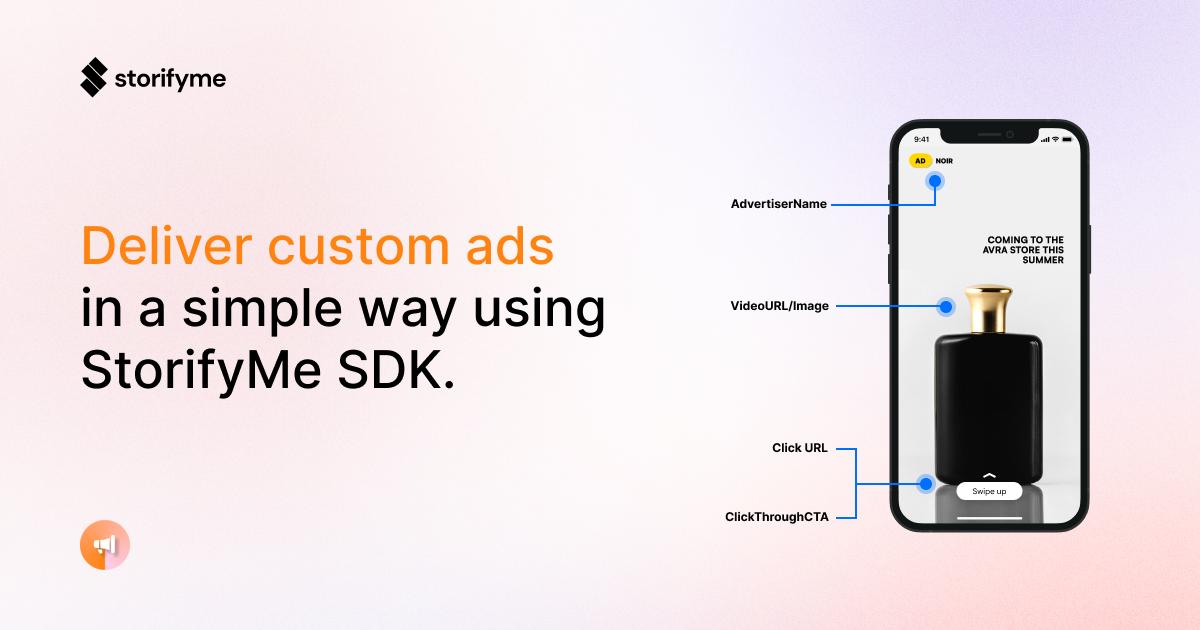
It's important to note that every Custom Ad has the following fields (you can see in the image above where the fields will show up):
AdId
A unique identifier for the advert.
AdvertiserName (required)
The name of the Advertiser or title of the advert. This is displayed to the user at the top left of the screen.
CreativeType (required)
Creative type can be either display for an Image Ad or video for a Video Ad.
VideoURL (required if CreativeType = video)
A URL to a video that should be used as the creative for the ad.
Note that only one of VideoURL or Image should be set corresponding to the value of the CreativeType variable.
The duration of the video ad is the video length.
Image (required if CreativeType = display)
An image to be used as the creative for the ad. The duration for image ads is 7s by default.
TrackingURL (sometimes required)
An impression tracking URL for the advert (need to add a pixel with this USD to the ad).
StorifyMe will make a GET HTTP call to the provided TrackingURL with query parameters showing the Ad config once the ad is displayed.
This field is required if a 3rd party impression tracker is needed.
ClickURL (optional)
Directs the user to the URL specified using an in-app browser / OS browser / deep link in the app.
ClickThroughCTA (optional)
Defines the call to action text, This defaults to "Swipe Up" if not supplied.
FullScreenCTA (Boolean)
If true, any click on the video/image should open the ClickURL, default is false.
AdDuration (optional)
Set the duration of the ad, overriding the default value of 7 seconds. Please provide this value when you provide CreativeType = video.
Configuring the Custom Ads in StorifyMe
To enable StorifyMe Custom Ads in your stories, please go to the Ads configuration, enable ads and select Custom Ad Source as a provider.
You can also configure this on a Widget level in the Widget editor.
This process is explained in more depth in the StorifyMe Widget Editor explanation page.
Please go there to read more if you have not already configured a widget.
Showing Custom Ads in the Widget
To show Custom Ads in the Widget, all that has to be done is to provide the array of Custom Ads to the Widget (as described in the previous step).
For example, here is a small piece of code that is used to show Custom Ads in the Widget.
First, we need to add the widget HTML on the page.
This process is explained in more depth in the Starting with Web SDK for Stories.
Please go there to read more if you have not already embedded a widget.
<script type="text/javascript"
  src="https://cdn.storifyme.com/static/web-components/storifyme-elements.min.js">
</script>

<!-- Somewhere in the code where you want the widget to appear -->
<storifyme-collection
  id="widget"
  account="<ACCOUNT_ID>"
  widget="<WIDGET_ID>"
  env="<ENV>"
  init="manual">
</storifyme-collection>
const widget = document.querySelector('#widget');

// Subscribe to onLoad event
widget.addEventListener('onLoad', (data) => {

    // Widget id loaded, let's initialize custom ads
    const customAds = [
        {
            id: 1, // A unique identifier for the advert
            advertiserName: "Brand Name 1",
            creativeType: 'video',
            videoURL: "https://cdn.storifyme.com/...", // Example video URL, please change with yours
            imageURL: null,
            trackingURL: 'https://example-ad-server.com/events', // An example impression tracking URL for the advert
            clickURL: "https://www.storifyme.com/?rel=example-story-ad", // Example ad url directs the user to the url specified using browser
            clickThroughCTA: "Learn More", // Defines the call to action text, This defaults to “Swipe Up” if not supplied.
            fullScreenCTA: true, // If true, any click on the video/image should open the ClickURL, default is false
            adDuration: 10 // Set the duration of the ad, overrides default value of 7 seconds
        },
        {
            id: 2,
            advertiserName: "Brand Name 2",
            creativeType: 'display',
            videoURL: null,
            imageURL: "https://www.imagineforest.com/....", // Example image url, please change with yours
            trackingURL: null,
            clickURL: "https://www.storifyme.com/?rel=example-story-ad",
            clickThroughCTA: "Learn more",
            fullScreenCTA: false,
            adDuration: 6
        }];

    // Load custom ads to the Widget and show them
    widget.setCustomAds(customAds);
});

// Load widget
widget.load();
Please make sure that you provide enough ads to the Widget so all of the slots can show. Otherwise slots that do not have an add for it will be hidden and the user will not see them.
After this setup is done, you are ready to show ads to your users. 🎉
Please, reach out to StorifyMe team if you need help with any of the steps.